3/13/2010 Update : There have been many changes since the late 2009 Demoman v. Soldier WAR update, namely three additional weapons for the Demoman. This guide was written with only the original standard weaponry available. Some additions were made to account for defensive opportunities opened by the Scottish Resistance.
Prologue: Gaddammit, Nikky!
Duke of Demolitions. The Nitroglyceride Negro. Black Scottish Cyclops.
The Demoman
When I started playing Team Fortress 2 at the behest of my friends DrJones and Taross in February of 2008, I had no idea what the classes were capable of, much less what the classes were. I initially felt the Scout would be the solution for me. The little pipsqueak did nothing but let me scamper around like a brain-damaged mouse with no hand-eye coordination. Then came the Soldier, whose rugged, grizzled grit was perhaps too cumbersome in my noobish clutches, giving me mixed results.
As they say, third time’s the charm: I then met the Demomahhn.
With the first victims I managed to detonate, liberating their limbs from the hated oppression of their torsos, I knew I had some special connection with the handicapped, jeering drunkard. I staked out my prime hunting spots in places like Turbine and Quarry (in the fond old days when stickies could not be moved and laying an unattended net about an intel case was a defining trap of the Defensive Babysitter Demo). I familiarized myself with the beat and tempo of this jazzy character, learned the basics as best as I could, then began to experiment. As anyone establishing their career class, it’s important to experiment to learn the sneaky nature of the class and how to use environments to one’s advantage.
That’s where this particular article comes in handy. It’s the shavings of my experiences with this wonderfully versatile class. You can take my advice or leave it as you wish, however as one of the top-scoring Demomen of our quaint little community at over 700 hours of experience I think it’s a good bet that I know my stuff! You might even learn something new. Every map has different characteristics of effectiveness for an observant, creatively imaginative Demo. Today’s map is one of the best. But first, you must know your tools:
Sticky Bomb Launcher
The primary weapon of the Demoman. This lass is his most versatile weapon, functioning better in defensive application but devastating in certain offenses. With a salvo of 8 bombs which stick to most surfaces floor, wall and ceiling, the Demoman uses these detonator-dependent explosives to set traps for enemies entering within their blast radius. Projectiles from this and the Scottish Resistance fire in a ballistic arc that can be extended by charging one’s shot.
The Scottish Resistance
The alternate-primary weapon of the Demoman as of the Demoman/Soldier update. A defensive modification of the classic sticky bomb launcher, It has a larger mag than the original, able to place up to 14 bombs that can be selectively detonated by targeting them. Traps can be more complicated and effective with the right application. However, its detonation primer is slightly slower, making direct combat less reliable. It also has the ability to destroy enemy sticky bombs in the explosions of its own bombs.
Grenade Launcher
The secondary weapon of the Demoman. Best suited for offensive situations, this baby fires up to four grenades in-between reloads. This weapon, like the other bomb launchers, fires in an arc that must be compensated for. It cannot be charged. A direct hit delivers immediate detonation and full damage for your range-to-target (RTT), while bouncing off of a surface activates a short timer, after which the grenade detonates for slightly reduced damage, making it excellent at suppression.
Both Stickies and Grenades have a blast zone–a shell of range which they can do damage in, extending up to six feet (for stickies) or three feet (for grenades) from the bombs themselves. You will do more damage the closer to the center of this range your target(s) are.
Chargin’ Targe
A sturdy medieval buckler with a pike on the end, this alternate-primary weapon replaces sticky launchers and serves as a defensive buff for the Demoman against explosive and fire damage. It is also a charging weapon that does low-range (approx. 20 HP) damage on full-length charge with an enemy. This weapon is commonly used in conjunction with the Eyelander or other melee weapons as it causes a melee mini-crit at half charge and a full-crit at full charge. Sorry, no charging crit-stickies or grenadeshots.
Scrumpy
The original tertiary/melee weapon of the Demoman. It’s alcoholic cider in a hardened, heavy glass bottle. What more of an explanation is needed? Oh, contrary to belief, it does not do more damage when broken.
The Eyelander
One of the six melee weapons available to the Demoman and the mostus awesomus fun weapon the Demoman can have. A wicked Scottish claymore with excellent range, it nonetheless penalizes you for 25HP at the outset of your life. However, an additional 15HP are bestowed to you for every decapitating kill made with the Eyelander. Kills also award additional slight speed boosts until four heads are taken for the maximum of 210HP and nigh Scout running speed. It cannot crit on its own. When used with the Targe, it forges the once mid-ranging indirect combat Demoman into a tanking, close-range berserker!
The Scotsman’s Skullcutter
One of the six melee weapons available to the Demoman. A rusted battle halberd. Unlike its cursed claymore sibling, it takes (or grants) no health to the player, but has a 20% increase in melee damage coupled with a 15% decrease in movement speed to about Soldier-speed.
The Pain Train
One of the six melee weapons available to the Demoman. A long, blunt plank of wood with nails and a railroad spike embedded in the end, it allows the player to push carts and capture points as fast as a Scout, at the cost of taking 10% more damage from enemy bullet-fire.
The Frying Pan
One of the six melee weapons available to the Demoman. A heavy cast iron frying skillet. Haggis not included.
The Horseless Headless Headmann’s Headtaker
One of the six melee weapons available to the Demoman. Same stats as the Eyelander…only spoooookier!
All of these weapons have their applications, but they are merely clumsy toys if the Demoman does not employ the thing that makes them most dangerous in his hands: Tactical Inventiveness! (a little liquor never hurts, either, for you of-age types). Now that you know your tools, let’s venture on…
Hot Steel (RED Defense)
CP_Steel. Steel is one of my favorite (if not my top favorite) cap-point maps to play as a Demoman. Steel is, essentially, a rocket launch facility that is bundled up like a fortress; its mingling of open, clear perimeters which tighten down to tight close-quarter action makes it a dynamic and exciting environment for practically every class. The overarching objective as a turn-based CP is for BLU to capture E, the final point. BLU can make this job easier for itself by capturing points A through D in succession, opening new paths and making E cap a more accessible point for them. RED is to prevent this capture and any others at all costs.
Since the Demoman is a primarily defense-oriented class, and this article is geared towards Defensive strategy, let’s put our bomb-pissing drunkard on RED first. Your concerns as a RED Demoman on Steel are:
- Suppressing enemy advancement towards your capture points
- Be on the lookout for any signs that the enemy’s Engineer has a forward base
- Taunting and Jeering
- Lay traps to kill any enemies that could be crucial to breaking your team’s defense
Perimeter Cap A: He Who Knows Not..
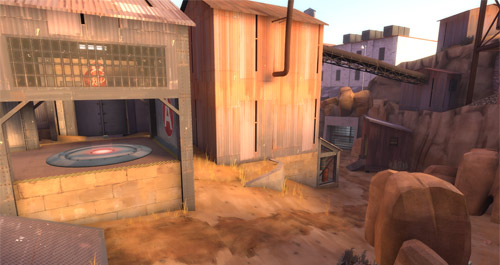
Your cap point has two ways BLU can access it: A longish run uphill from the main gate around the corner, or, coming over the top of the fronting wall to drop in front of your spawn exit court (and behind A Cap). My personal cuppa is the classic stickying of the exits. Now where you place your sticky bombs is an evaluation you must make based on one simple fact: He who knows not, suspects not. If you want to maximize the chances of a kill, you will hide your bombs where the average player will not look.
Put yourself in the enemy’s shoes and mentally run out those exits with him. Envision where his eyes will focus to find threats. Most commonly this is at the ground level where enemy players and sentries will most likely be located, making overhead spaces the ideal to place your traps. If an enemy is coming out a doorway staring straight at the opponent he intends to engage, of course he will be less aware of the string of stickies placed just outside that door, above his head.
Three stickies are usually enough to murder any class save a Heavy, so three will be satisfactory for the fronting wall window exit. This leaves you with five to spread in overlapping cover upon the eaves of the main ground level exit for more coverage. It’s all about coverage when thinking of how many to place. With luck, you’ll have a place you can settle at to properly detonate those bombs the instant a fly wanders under your trap. Update 3/13/2010: The Scottish Resistance’s 14-bomb placement effectively doubles the explosive coverage, and the damage is exponentially multiplied. You must have a keen eye or a quick spotter in order to take full advantage, however. An array of six bombs is enough to explode even an overhealed Heavy, so six per exit, plus two as overflow (placed ahead and hidden to catch the faster classes, like Scouts, that can escape your bombs by their speed).
An important thing to remember about startup trapping: Usually you can count on a Medic or two with full Übercharge to be coming out with his patients. If you get a tip that BLU will be coming out with an Über ready, then the Medic is your prime target, not his patient. Any wise Medic will wait until the opportune moment in the field to use their Übercharge on their patient. As such, let his patient run safely under your bombs, follow the link of that blue Medigun trail, and blow your bombs the instant the Medic steps into the blast zone. If you’re lucky, congratulations boyo: you’ve just blunted the spearhead of BLU’s offense! You can bet there’ll be plenty of cursing on their end. But be sure to hide yourself as best you can from BLU’s view; a lone Demoman seen standing in the open, watching the doors, puts the enemy on alert to traps. But he who sees not…
Falling back from BLU’s spawn, you have other opportunities to trap your enemy. The fronting wall on RED’s side is a sheer drop to the court. Eager BLUs looking to charge in will peek over this ledge before dropping in. It’s a prime place to lay sticky bombs either on the wall face itself, or on the ground directly in front of it. Eight stickies are enough to make this area a lethal death trap for anyone foolish enough to drop in without looking down first, and your grenade launcher, properly aimed, can discourage enemies from straddling that ledge to try to fire down on the cap. Beware the fact that the berm of the ledge provides BLU Demomen a position from which to shell you with indirect grenade fire if you choose to stand on the ledge.
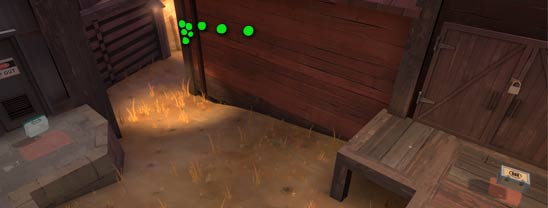
If you chose to go low, there’s numerous corners you can hide stickies on. Additionally, the shed that contains a full health box is a wonderful place to plant bombs for anyone seduced by the concept of full healing and a shelter from attack. Just remember to hide those stickies from being seen by anyone who runs in (at least, until it’s too late).
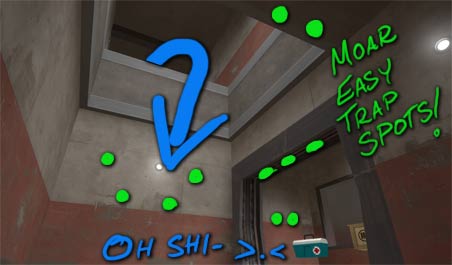
Eventually you may find yourself being pushed back to the cap itself. If you find yourself there, you’ll notice that the point has horizontal struts overhead which ring the platform. These are acceptable places to put sticky bombs due to the nature of them being overhead (and thus less likely to be seen at first glance). With an adequate spread, you can manage to injure attackers if not outright kill them. With luck, you or your teammates can then finish off survivors and retake the point. Stickying the ground of the point is fine and will do in a rush, but placing those bombs above eye-level is even better trap for an enemy that feels the way is clear.
Inevitably, the unthinkable happens: BLU comes in force and your backup is still too far away (or respawning), and thus you must fall back. Cap A is lost; it’s time to defend B.
Perimeter B: Spittin’ Downhill…
Like Cap A, Cap B is a point that BLU must fight an uphill battle to get. These situations reward RED with the high ground advantage. B also has the boon of a more direct attack alley than A. There is no chance of BLU flanking RED, unless RED was incompetent enough to allow BLU to get an Engineer somewhere into their base.
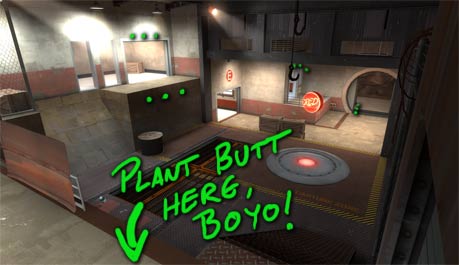
For the early bird–err, Demo, BLU will most likely be charging down the access alleyway leading straight from A, drunk on victory from their successful siege and spamming their battle taunts. Leave a spread of stickies for them at the dropdown chamber where the full health and 200 metal boxes are to…sober them up a little. Be ready to feed a salvo of pineapples (grenades) into that alcove from the B side also, to deal with any of the friends of the victims you just detonated and who will no doubt not grasp the danger they are in before they drop down onto their comrades’ squishy, mangled remains.
Like A, B has an access way that is both primary and secondary: BLU can run out the main gate from their spawn area at ground level and into the basin, or, they can take the stairway along that path and cut to the top of the basin wall, from which a chain link fence and Sniper cabin front B. Both paths meet at the front of the basin leading to the cap.
If you wish to deny BLU access to the main entrance it’s just an easy matter of sticky-bombing the main entrance itself and using grenades to force BLU into cover, but be prepared to be flanked from high left when BLU comes up the secondary path. The secondary is a more important path in my estimation due to the ease with which it gets BLU into play safely, and, its ability to be locked down with an Engineer’s sentry (a sneaky BLU Engineer can have a teleporter up in the Sniper cabin without your dunce teammates realizing it). Plus, its tight quarter stairwell concentrates the effectiveness of your munitions. Therefore, denying BLU access there is more apropos for you.
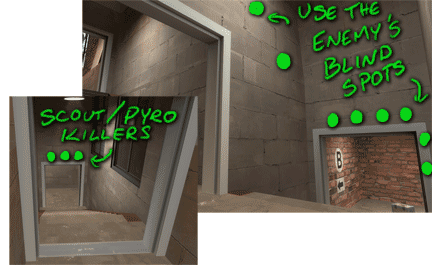
When placing stickies here, cover your bases well. A BLU Medic-Buddy team could be using this stairwell to get their Uber past the basin and quickly into range of the cap. My personal touch is to hide a pocket of four stickies over the first doorway into the stairwell, then the rest beyond the second doorway at the L-bend. This ensures that you have bombs adequately spaced and of sufficient power to kill anyone that charges into the L-bend. Hopefully an Übercharging Medic and his unsuspecting patient (and anyone among them caught in the blast). For anyone who perchance avoids and/or survives your trap and is determined to charge up the steps at you: feed them some pineapples until they stop moving. Even novice Demomen will have little trouble racking up kills in this close-quarter death alley. Just be wary of going down to re-place those stickies; that’s an unlucky time to come face to face with a Scout or Pyro.
The basin and its low ground is your advantage when firing upon the enemy, but should you end up surrendering it and being pushed back to the cap, all is not lost. You can launch stickies over the wooden fencing barricading B cap from the spawn area and detonate them in mid-flight over the heads of any BLUs on the point. And if that is not feasible, there is another Sniper nest that RED has ready access to, overlooking B itself. Observant Demomen will use this to discreetly lob stickies down onto B from the window.
Of course, in our scenario, luck turns for BLU: The perimeter is lost, your base grounds breached. It’s time to fall back…
…Or rather, it’s *almost* time to fall back. Once BLU takes B, any forces on the cap have two directions they can go: Into the base and past the E Core chamber to get to C, or further up the hill where a gate in sore need of some WD-40 is slowly opening to allow the same access. Let’s stop in wait at the Grand Rusty Gate.
Looking back downhill, you will see the corner you came around to get up here. Place a cluster of four sticky bombs just over eye-level on the right wall, then step back the final four every foot or so, creating a “comet tail” trail of stickies. This is adequate enough to kill anything that comes around that corner as long as you are vigilant enough to detonate before they pass the tail of your bomb comet. It’ll be the strategy for the secondary hall access to B all over again. You have metal and a nearby medium health pack to last you if you wish to make an extended stay. But do not forget that BLU does not need your precious little alleyway to get to C, and if you have no action after a while it’s highly likely that BLU is attacking your base elsewhere while you sit on your bombs. Keep moving; when engaged in stalling guerrilla tactics like these you never want the enemy to be able to pinpoint your location.
Basin C: The Point of No Return
Now that the perimeter has fallen, your base is in twice the peril than it was before. BLU can enter your base via blast doors and access ways at both A and B; They have ready access to the rocket core, E cap (though still only Scouts, Soldiers and Demomen can rightly touch it); They can now begin infiltrating your base proper, and crafty BLU Engineers will be looking for unscouted locations inside your territory to set up a forward base and/or sentry nest. It’s only going to get worse if C falls to BLU, as this triggers the catwalks which will allow Pyros, Medics, Heavies and all other baddies access to E. Holding C, a cap with several blind spots yet still overlooking the deepest dry basin yet, is your last chance for a relatively focused defense.
You will function best as the doorkeeper, here. The gate from B, high behind the retaining wall opposing C cap (where you just came through if you were corner-camping), is a major entry point for BLU. It allows BLU to run the rim of the basin and drop down to a convenient hallway ramp that leads straight to the cap. But almost as important are the two entryways on ground level, one above the other. The lower entrance holds a full health box, the upper, 200 metal for an offensive BLU Engineer to establish a forward base. An Über pair can also run out from below under cover from most effective sentry positions and charge the point in a matter of six seconds before deploying. All of these things must be checked for at intervals, and turtling on C–that is, staying in the safely watchable area and not investigating the immediate surroundings leading to it–can be an invite to BLU to build fortifications, charge and ready Übers.
Now as the doorkeeper, you want to either resort to the aforementioned B-C stalling tactic while keeping an ear open to any sounds of battle in C basin; place stickies at locations adjacent to as many entries into the C area as you can reliably watch; or adapt the B-C technique for use at the OTHER accessway from B to C: The one previously mentioned which crosses in front of E. Doing so for this accessway denies multiple routes for BLU. It prevents them from accessing E via B, and cuts off their access to the two ground entrances to C by your slaying them before they can reach the fork in the paths leading to them. You don’t have as close a quarter as you did in the side stairwell on B, so you will need to be more accurate and steady when using your grenades if your placement of stickies fails to kill the enemy. But you and a fellow Demoman (or most other classes) can effectively deny the enemy their access to C.
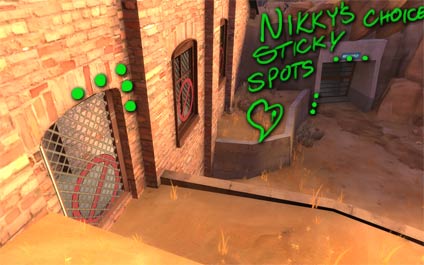
Additionally, here’s something many people don’t know: The grate in the floor at the doorway that leads to C (the one with the view down into the lower accessway, where a full health box rests) does not block splash damage. If you’re on one side of that floor/ceiling grate and the enemy is on the other, set some stickies on it, back away, and nuke the suckers.
3/13/2010 Update: The Scottish Resistance’s independent cluster-detonation ability comes in great use here. You can leave a cluster of six or so stickies placed beneath this grate and go about your defending in C until you see BLUs treading over it, at which point you can detonate.
These tactics are all one way a Demoman effectively defends: By keeping the enemy as far from their objective as possible. Even if you are killed while forcing the enemy to use an Übercharge out of fright or in the effort to kill you, you will have forced them to use such a deadly tool prematurely, blunting (or nullifying) its intended effectiveness in the area beyond you. In a game of chaos like Team Fortress 2, such acts can snowball into a win for your cause.
Should BLU push hard enough to reach the cap, however, you still have last ditch options: There are numerous blindspots from the spawnward access, from the rampway leading up to it, and from the basin itself due to the steepness of the incline. If BLU is swarming the point and you have not been noticed, you can attempt to get into the shadow of the point by the stairs leading up to it and toss stickies or grenades up onto it, detonating when you have a sufficient number to cause wide damage (three or four). There is also the option of tossing those bombs from the location of the half-health medic box opposite the cap platform. Or charging balls-out into their midst from the spawnward ramp. A Demoman appearing in your midst around a blind corner with his bottle out, yelling wildly and swinging, is a frightening sight! …Well, usually…
But let’s say your valiant efforts are not quite enough, and you fall as control of C is wrested from your char-stained mitts. It’s certainly looking bleak my friend. The facility’s inner walls are your only refuge and they are soon to be crawling with BLU. If you are able, meet RED in the hallway that contains your spawn room door which they will almost certainly charge through to get to D.

You can try stickying the walls holding the doors leading in from C to see if you get lucky and tag some BLUs, but more than likely you will end up trying to defend that stretch of a hallway in-between your two spawn doors which joins C to D. Standard hallway defense applies, of course: Sticky up the doorway BLU will enter from on your side, detonate on those that come through and launch grenades at the survivors. More than likely you will be needed elsewhere soon, due to BLU now having access to your base via A and B as well as C. BLU’s focus is still, ultimately, the capture of the core at E. But the one thing which will make this easiest for them (and thus require your defense) is:
Interior D: Warding the Waiting Room
D is your last shot at ground you can control from a relatively watchable radius. BLU has four ways to enter D: From the elevated ledge that leads in from the C-D hallway, running across RED’s spawn doors to drop onto the cap itself; From the two portals that lead in from both A and E’s joined access route, both portals being directly across from D cap; and from the entryway to E, if BLU manages to infiltrate E and cross the gorge to the other side. There are lots of options for BLU but all of them still avoid surrounding RED, allowing for the possibility of keeping all eyes in the general directions that BLU can enter from. Plus, D has ready access to RED’s spawn, which is certainly a plus for health and re-arming.
It’s really going to come down to team cohesiveness at this point. Your team must be capable of watching the access ways and chasing the enemy back, because if BLU manages to confine red to specific locations inside their own base–say, the D cap room or the core room at E-then that gives BLU free reign over a huge share of the entire map, tipping the balance and limiting the effectiveness of keeping BLU from rushing a force in from any point.
You should be more effective in the close quarter of the inside, but you want to be on the lookout for any signs that the enemy has a forward base or teleporter set up: An excessive grouping of BLUs denying RED access to a location, the definitive blue sparklies falling from the feet of enemies you find in your territory, etcetera. If it turns out that BLU does have a base then destroying it, like before for C’s defense, will become your priority. If BLU can get right to the front and keep attacking, they will fear death less, take more risks to weaken your defenses, and eventually force through by the sheer frequency of attacks. Good places BLU Engies love to build are:
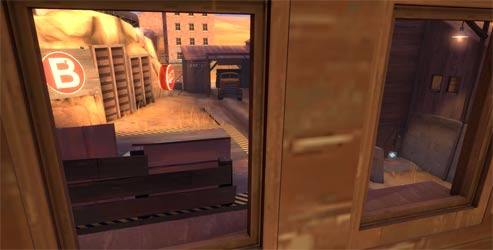
- The control cabin that observes E core through tall glass windows. A full health box and 200 metal sits here, and the junction forms an easy access to D and E via Perimeter A cap for BLU that is moderately difficult for RED to retake.
- The stair hall leading from Perimeter B to E (the same you might have chosen to defend when C was in danger). BLU Sentry placements can be made here in a variety of ways, and BLU Engineers can leave a teleporter in a nook beside the rampway which is commonly overlooked by REDs who manage to destroy the base here.
- C cap. Another location that provides swift access to D and E, and is also far enough away from the fronts of those areas to avoid easy detection.
Check these locations if you are on the hunt for an Engineer’s nest, as they are among the more effective locations. How you tackle them is up to you, but remember: In a pinch, all you need is three sticky bombs near a sentry to take it down.
Back to D, however: You can place sticky bombs on the wall of the dropoff ledge specifically for BLU to fall in front of and detonate, or you can get up to that entrance access itself (the one fronting the spawn door) and place bombs over the heavy safe door entrance, stepping them back in your spread to widen the blast range and kill anyone who steps foot through that door. It may meet with mixed success as the enemy is spoiling for a fight when they enter that little door, which makes trying to hold down the hallway it connects to a potentially more effective prospect. If there is heavy harassment coming from the portal opposing D point, lay some stickies in wait at the foot of the guard rail at the L-bend visible just beyond it. Often times the enemy coming around that bend and staring into D Interior are not looking down at the little guard rail to their right hip. It’s a prime spot to hope and catch a Demoman or Soldier who is trying to spam-kill any sentries that might be visible from there.
3/13/2010 Update: In the closer quarters of the interior your bombs will be more effective, and the ScoRes’s abundance of bombs will make a good minor deterrent visibly (and wider variety for trapping covertly). Cover all the aforementioned entrances as best you can with your fourteen sticky bombs, and in this situation it would be useful to have the Eyelander to finish off those that possibly survive your explosions and gain yourself some speed and health boosts. A powered-up, greased-lightning Demoman is a frightening thing to face.
D is somewhat difficult to defend if BLU is determined to take it, and any Über that manages to be popped while in the chamber has the potential of dealing heavy damage due to the relative close quarter. But D is defensible with a coordinated defense and teamwork. Usually, however, a determined BLU will attempt to divide your team’s attention again by harassing E, especially if they have a chance to hop onto the point. This is why defending D is a troublesome prospect, and many teams tend, unwisely, to surrender D just to fortify E. if you find yourself stressed with BLU’s push on D, you can try and gain the high ground by your spawn and lob stickies and pipe bombs down upon the capping enemy, using the gate and plate walling nearby as cover when necessary. A Demo can watch the entire interior from a perch atop D’s stairwell, and from this position stickybombs placed at those entrances can all be monitored as needed.
But let’s not be fooled; D is often unholdable even with the best of teams. Perhaps you find the Interior falling to your foes and are forced to retreat. It’s bleak, yet all is not lost, yet.
Core E: The Last ‘Oorah.
The Rocket Core is the ultimate objective. It’s what BLU is after, and it’s the most important part of your base. BLU has access to E from the start of this map, but only crafty strategies will allow BLU the chance to steal it from RED before the defenses and outer layers of the facility have been taken, due to the fact that most of its easy accesses and platforms to allow access for every class must be made available by the capture of the other locations. Nevertheless, you might see BLU sending Scouts, Demomen or Soldiers to E in an effort to threaten capture and distract your team from their defenses of other parts of the base.
While it’s imperative that BLU not be allowed to capture E, it’s also important not to break an area’s defense down in order to go deal with what could be a minor threat. This is extra important if you are the keystone to the defense effort by performing area denial on a stairwell or a basin.
But if the facility has been surrendered and the core remains your last thread of possession to you, then it’s time to knuckle up.
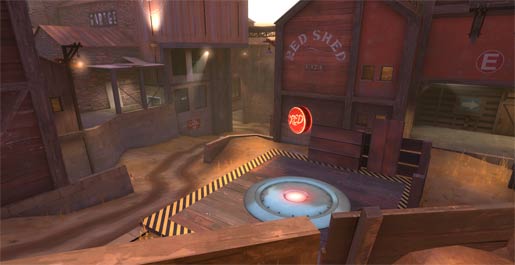
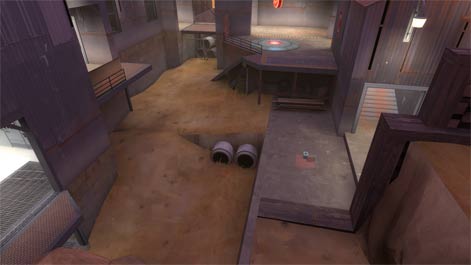
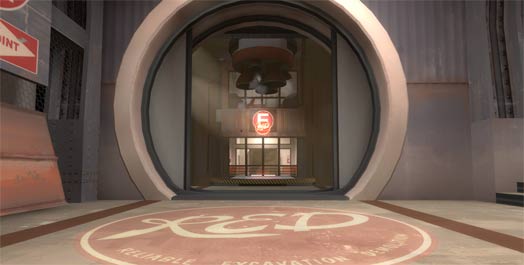
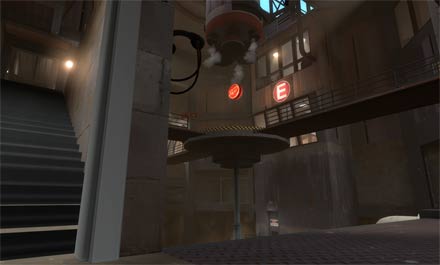
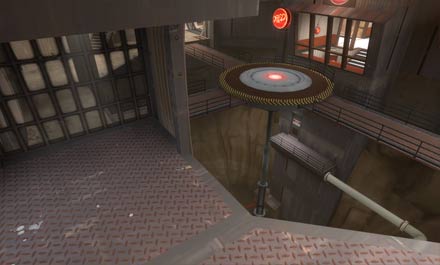
E Core has four access ways BLU can attack from, all of them bad for you. There is the B cap entryway at 12 o’clock to the point (pictured above); it has a ready catwalk to the point. There is the A cap entryway at 3 o’clock to the point, also with a ready platform. There is the D-cap entryway at 9 o’clock which leads to a third catwalk. And there is also the stairwell access underneath RED’s raised Sniper/Sentry platform which leads from the C cap basin through its underground tunnel and up to merge with the B door entryway. This location is particularly troublesome for RED because it contains a sub-platform from which a BLU Demoman or Soldier can easily lob shots up to the superior platform’s ceiling and detonate any in-range enemy personnel or buildings from relative safety.
But where E Core is as exposed as the discarded panties of the Scout’s mother, it is also a place for RED to marshall its full strength and focus, secure the area for the Engineers to erect any sentries, and push back. Demomen can be instrumental to this.
Assuming your team can watch E sufficiently, your primary goal should be to hunt down forward BLU bases. Doing so will buy your team some breathing room due to making BLU have to run the distance instead of being immediately at the front. Never, ever underestimate the importance of destroying that enemy teleporter or re-gaining territory when under siege; it can save the game for you. But as an agent of push-back, particularly in an effort to stall and buy time for your teammates to support or assist, you should work to flush BLU out of the area with your bombs and lay them down in visible places. Counter to wanting to kill them by surprise, this will notify the enemy that death or severe pain awaits if they enter your territory, pushing the boundary back. Every room you can re-secure for your side moves their effectiveness back a touch, as nothing is worse than the enemy at your gates, seconds away from their goal, so close they can taste it.
You will need to scout possible places a BLU Engineer might build and laying traps again, such as in doorways of areas that have been recently re-taken and where BLU is expecting RED to have surrendered in exchange for fortifying the core. Above all, be mobile. Move around, move from one location and trap to another, and never turtle yourself inside the final area. Never underestimate the effectiveness of such guerrilla tactics; keeping the enemy guessing as to where traps will be adds an edge for you by making the enemy cautious and slowing down their rush. Your Engineers may get time to re-establish a fixed defense with support buildings for the other fighters.
If BLU manages to push their way into the core and claim the point, you fortunately have a few options to clear them off:
Remember that subplatform mentioned earlier? You can try to slip down there and perform the same act from the defense of cap C, in tossing stickies and pineapples onto the capture point in sufficient quantities that it will detonate everyone aboard it. Hopefully they will be jumbled and pacing close enough that they will not notice. 3/13/2010 Update: Keeping a spread of stickies on the point will make anyone running to it wary, be it the normal launcher or the ScoRes. With the Scottish Resistance, of course, you get to keep those stickies there while using others in your defensive efforts, detonating them only when you need to.
There is also the platform above that one. You know, the one Engineers can’t resist spanking their sentries upon and spamming ‘Help’ from. With its superior position and slight shielding against B door, it makes a good position to rain bombs down upon the enemy. When rushing the point, lining up the enemy using the catwalks and tossing pineapples into their midst is good for using splash damage to wax the lot of them. Sticky bombs roll on the catwalks, but stick to the cap point. In most cases, especially if they have a Medic on the point with them, you don’t want to throw and detonate individual sticky bombs; it will not be as effective of a sure kill as a spread. This is, of course, situational. And if a Pyro with a flamethrower airblasts them, your spread could be ruined. But in the end your splash damage may be the last thing standing between your team and certain loss.
If it comes down to you keeping sticky after sticky on that cap, then that is what you’ll have to do. E cap does not run down quickly, and there should be enough time for at least one respawn and concerted attack from RED to rush the point. So pick your safe spot and soften those BLUs up with every bomb you have in the hope that you’ll be able to win through.
Steel is a complicated map. Like the best ones, it demands the use of the environment if a Demoman is to be an effective credit to team. It demands you exercise some spatial awareness in placement of stickies behind doorways and over eaves, and weigh your priorities accordingly when it feels like BLU team mercenaries are coming from all corners. But it’s a map where the Demoman class really shines, too!
I hope this was helpful and informative to at least some of you. Stay tuned for The Offensive Demoman on CP Steel Part 1!
But not so soon. I’m off to the Netherlands, then Eurofurence, for the next two weeks. Ta!
Feedback for The DemoVixen’s How-To is totally welcome either here or on Niko’s Steam Communities profile page.
– Voop Out


