Howdy again, all! It’s time for another edition of the DemoVixen’s How To. I got some good feedback from the last tutorial and I’m hoping to make as good a mark with this one. It will be split in two, however, to keep from exhausting you all. I’m trying to avoid making them so huge, I promise!
Subjects:
Prologue
Demoman weapons summary
Steel Cap A
Steel Cap B
Steel Cap C
Prologue: Nosce te Arma (Know thy Weapon)
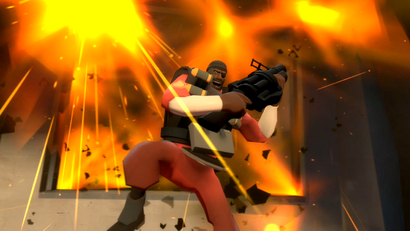
Duke of Demolitions. The Nitroglyceride Negro. Black Scottish Cyclops.
The Demoman
Every map has different characteristics of effectiveness for an observant, creatively imaginative Demo. And today’s map is one of the best. But first, you must know your tools. Feel free to skip if you already do, but for the newbies:
Sticky Bomb Launcher
The primary weapon of the Demoman. This lass is a most versatile weapon, functioning better in defensive application but devastating in certain offenses. With a salvo of 8 bombs which stick to most surfaces floor, wall and ceiling, the Demoman uses these detonator-dependent explosives to set traps for the enemy to take harm when they wander within the blast radius. Projectiles from this and the Scottish Resistance fire in a ballistic arc that can be extended by charging one’s shot.
The Scottish Resistance
The alternate primary weapon of the Demoman, differentiated from the original by a caution-strip-taped bomb canister and added laser LED. This beaut is a modification of the classic sticky bomb launcher, one of the new Demoman unlocks as of the Demoman/Soldier update. It has a larger mag than the other sticky launcher, able to place up to 14 bombs that can be selectively detonated individually or in close clusters. Traps can be more complicated and effective with the right application. However, its detonation primer is a fraction of a second longer than the sticky launcher, making airbursting a slower affair. It also has the ability to destroy enemy Demoman sticky bombs in the explosions of its own bombs.
As this is a primarily defensive weapon, we won’t be focusing on it for this tutorial.
Grenade Launcher
The secondary weapon of the Demoman. Best suited for offensive situations, this baby fires up to four grenades (or “pills” or “pineapples”) in-between reloads with a damage potential greater than that of the primary weapon when accounting for its damage-per-second. This weapon, like the other bomb launchers, fires in an arc that must be compensated for. It cannot be charged. A direct hit delivers the full range of damage for your distance (or range-to-target, RTT) while bouncing off of a surface activates a minor timer, after which the grenade detonates for slightly reduced damage.
Both Stickies and Grenades have a blast zone–a shell of blast range which they can do damage in, extending up to six feet (for stickies) or three feet (for grenades) from the bombs themselves. You will do more damage the closer to the center of this range your target(s) are.
Chargin’ Targe
A sturdy medieval buckler with a pike on the end, this alternate-primary weapon replaces sticky launchers and serves as a defensive buff for the Demoman against explosive and fire damage. It is also a charging weapon that does low-range (approx. 20 HP) damage on full-length charge with an enemy. This weapon is commonly used in conjunction with the Eyelander or Scrumpy bottle as it causes a melee mini-crit at half charge and a full-crit at full charge. Sorry, no charging crit stickies or pineapple shots.
Scrumpy
The tertiary/melee weapon of the Demoman. It’s alcoholic cider in a hardened, heavy glass bottle. What more of an explanation is needed?
The Eyelander
The alternative to Scrumpy and the mostus awesomus fun weapon the Demoman can have. A wicked Scottish claymore with excellent range, it nonetheless penalizes you for 25HP at the outset of your life. However, an additional 15HP are bestowed to you for every decapitating kill made with the Eyelander. Kills also award additional slight speed boosts until four heads are taken for the maximum of 210HP and nigh Scout running speed. Used in conjunction with the Targe, it forges the once mid-ranging indirect combat Demoman into a tanking, close-range berserker! Your style of play will vary, but this guide is made for the bomb-slinger, not the sword-swinger.
All of these weapons have their applications, but they are merely clumsy toys in the hands of a toddler if the Demoman does not employ the thing that makes them most dangerous in his hands: Imagination. (a little liquor never hurts, either, but still). Now that you know your tools, let’s venture on…
So without further ado…
Cold Steel (BLU Offense, Part I)
CP_Steel. Steel is one of my favorite (if not my top favorite) cap-point maps to play as a Demoman. Steel is, essentially, a rocket launch facility that is bundled up like a fortress; its mingling of open, clear perimeters which tighten down to tight close-quarter action makes it a dynamic and exciting environment for practically every class. The overarching objective as a turn-based CP is for BLU to capture E, the final point. BLU can make this job easier for itself by capturing points A through D in succession, opening new paths and making E cap a more accessible point for them. RED will attempt to prevent this capture and any others at all costs.
As a member of BLU the versatile Demoman will be primarily offense. Your concerns on Steel are:
- To Search and Destroy (sentry nest destruction)
- Interdiction via traps at access-ways (a spawncamp-free guide)
- Preventing RED from reaching their defense positions
- Jeering and Taunting
- Offensive suppression (yes, spamming)
Perimeter Cap A: Storm the Hills..
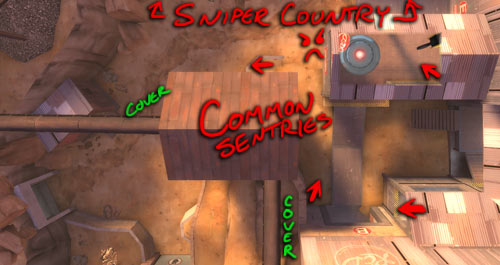
Figure a.1
As noted in the RED version of this guide, RED cap point has two ways BLU can access it: A longish run uphill from around the fronting wall, or, coming over the top of the fronting wall to drop into RED’s courtyard (and behind A Cap). You should always expect RED to have sentries set up to bolster their siege at your doors. Figure a.1′s red arrows show the most common placements and facings of enemy sentries.
As a Demoman, your primary purpose is building destruction. You are the most prepared class to take on RED’s sentries at medium to long range, so for the start it should be your priority to have a Medic (who has hopefully spent Setup time charging his Über) to follow you out into the fray and accomplish this. Personally, I prefer to take the high wall and flank RED from the courtyard. The benefits of this approach are threefold: surprise, since RED by nature of the map design is more likely to be watching the main ground area; high ground, which should be self-explanatory for its effectiveness; and the more relative safety for your Medic, who is able to duck behind the wall bulwark (cover in the figure), protected from conventional fire and able to heal you while you attack those in the court and on the cap (or any Sentry which might be down there).
However, if you decide to run the trench, hug the wall opposite the health closet to avoid being shot (cover in the figure). But you can’t stop here…this is Sniper Country. Snipers love to duck behind the boulders to the far left where they have a clear shot at both spawn exits, and their only real threats are your Spies and other Snipers. Hug the wall so that you can reach the right corner turn quicker, and be prepared to stare up into angry REDs and their sentries. This approach is the more direct approach and it’s good for trying to push RED back and pin them on the point and courtyard while your team either attacks from behind you or flanks them from the high wall. Expect concentrated fire.
Upon leaving the spawn you’ll have several seconds’ run before you get into the range of the sentries mentioned above, so be sure to clear the way so that your Medic is not endangered and forced to pop his Übercharge prematurely. As is the same for any class you want to maximize your effectiveness with an Über. As long as you prioritize sentries, then people, you will be fine.
With a single Übercharge, wise prioritizing and a little backup from your teammates, you should be able to destroy their buildings and clear the way for your team to mount a better offensive. After all, sentries, while weak and easy to kill, do not miss with painful bullets (and rarely miss with rockets), and are effective deterrents that frighten paper-skinned Medics, Scouts, Pyros… The onus is on you to ensure that they are destroyed.
Once they are, your task is to secure the control point and the grounds around it. Many people think that they’ll be alright as long as they hold the point. Often they are wrong, because they huddle in a corner without precaution or run in circles without looking to see what’s coming to try to remove them.
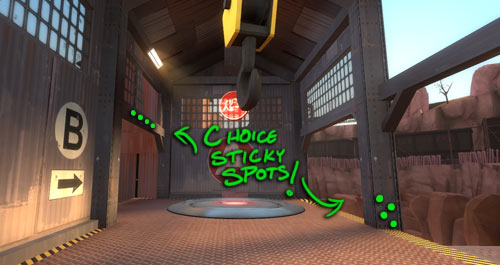
Figure a.2
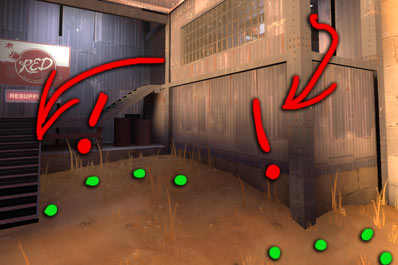
Figure a.3
To maximize your chances of holding on to the point, it’s imperative that you watch the exit that RED must use in order to approach. There’s only one, so it’s quite easy. I love placing bombs in these given locations (figure a.2), as they are invisible to rushing REDs leaving their spawn or running up the right ramp to attack you. Also, you can place trap bombs in the courtyard (figure a.3); you can bet that RED will be in panic mode, trying to get to the point to get you off of it quickly and less inclined to check for sticky bombs in these locations. On a personal note, this is as close to spawn camping as I feel is necessary, but your mileage may vary. With luck, you can repeat this and prove to be an effective deterrent, or at least wound RED enough so that they won’t stand a chance in direct engagement.
Congratulations, you’ve wrested the first perimeter from RED and established your beachhead! Keep the momentum going and head straight for…
Perimeter B: Sneerin’ Uphill…
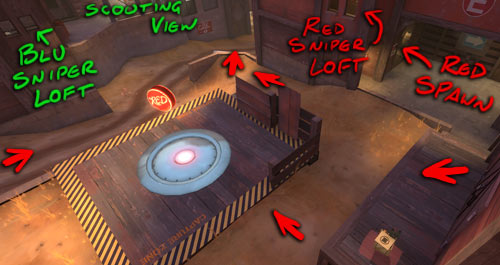
Figure 2.a
Like Cap A, Cap B is a point that BLU must fight an uphill battle to get. RED, with the high ground advantage and a single attack corridor from which to expect BLU to come, has a better chance of holding you back until the time runs out.
If you’re approaching from A, beware traps from evil RED Demomen who are already set up to rebuff your team. The drop down in the corridor from A to B can be sticky-mined. Warn your less-observant teammates and look before you leap. Similarly, be on the lookout for traps coming from the side stairwell leading from the spawn to B; any Demoman worth their salt (or who has read my last guide) will know how effective sticky-trapping this stairwell and its entryway is.
— IMPORTANT —————————-
You should never run blindly into any new location. Take the time to listen for the distinctive idle beeping of a sentry. To adapt a phrase from Three Dog: Beep-beep-beepity means slow your ass on down, kids. The number of beeps will tell you what level it is. If you hear sentry fire or see one of your comrades’ names pop up on the death report after a sentry icon, you should know what sort of threat likely lays ahead. You are given these cues from the game for a reason. Use them. Figure 2.a shows a worthwhile scouting spot where you can view all the possible locations a sentry can be at.
————————————————
Some Engineers also like to place sentries on the front ledge that faces both BLU’s exit into B territory and the aforementioned dropdown (topmost arrow in fig 2.a). It’s a good way for proactive Engineers anticipating a loss at A to pin down the advancing BLUs and buy their team some valuable respawn and setup time on B. Expect this. Unfortunately it’s a bad thing to be trapped by this sort of sentry placement in the dropdown. It’s nigh impossible to get a good firing solution without taking damage and you’ll probably die if you can’t run right to the main BLU doorway fast enough. Such a sentry can be taken out if you attack it from the scouting area/BLU Sniper deck.
If you take the stairwell to the BLU Sniper deck, you have the benefit of being able to lob stickies and grenades into the field at the opposing REDs and give your team the cover they need to advance through the trench. You also become vulnerable to all kinds of weapons fire. Fortunately only Demomen, Soldiers, and Scouts could possibly close with you up there, and you’d be able to see all of them coming unless they flank you from the stairwell itself. Keep the shots coming and suppress any Engineers you might see trying to set up more buildings. Target their Medics and force them to seek cover. Just like BLU has but one direction they can file into the B area, so does RED. If the coast becomes clear, you must secure that one entryway. Fortunately it’s enclosed enough to concentrate a carpet of sticky bombs and make RED deal with them.
Demomen, Soldiers, and Snipers all love the RED Sniper loft that fronts their spawn access doorway and overlooks the control point. If you see movement up in its windows, throw some bombs up into it to kill any enemy or force them to leave their roost. As long as you control that entry corridor for RED (remember about controlling the grounds around the control point, not just the cap itself), you should have no problem.
Congratulations, the Perimeter is yours! It’s time to push to their final exit and lock them in for good. Ensure that there’s no enemies waiting on the hill behind B to destroy you or your teammates when they come around the corner. Then let’s move on, boyo; the job’s not even half over yet…
Basin C: Lock ‘em In..
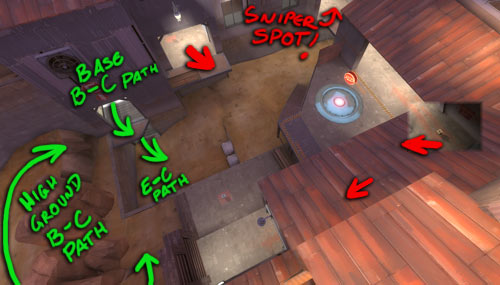
Figure 3.a
C Basin is a gift to BLU. BLU owns the high offensive ground and RED’s gotta fire up at the enemy if they want to stop them on the basin wall. Spies can infiltrate easily, and sentries trade firing effectiveness for vulnerability.
The base can be properly infiltrated at multiple points. BLU can enter via the high wall’s VERY slow gate, or, take the fast track through the base to come out at one of the other two exits (fig 3.a). With luck RED will be in disarray after failing to secure B, which means you can scout ahead to C hopefully before RED’s full strength respawns. However, don’t get careless and forget to sentry-check. As per the RED Demoman Steel Defense Guide, be mindful of exits into this area; enemy Demos may have them trapped. Especially THIS nasty location.
The gate immediately behind B cap is the readiest access to C, but by no means the fastest immediately after capping B, due to the slow gate that opens atop that hill. Because your offensive duty is to lock RED out of C area until your team can come in force to assist you, it is imperative that you get to the capture area ASAP to determine its vulnerability and, if possible, secure it.
Fortunately, this place is a biatch for RED to defend with sentries. See fig 3.a: BLU can have high ground at one end and no well-guarded RED sentry can cover all ground; It would eventually fall to a concerted push from BLU. You need to make sure those sentries are gone at the start of it. Edging and long-distance pineapple shots come in handy here.
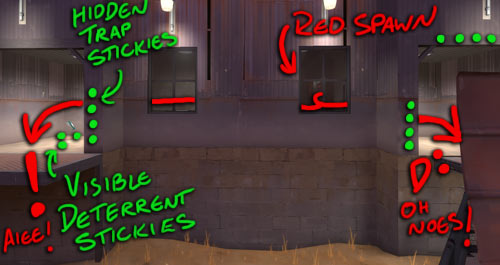
Figure 3.b
If you find yourself in a position to lock down C, here’s a useful trap tactic to employ. My confusingly scribbled-on figure 3.b shows you two useful options for sticky-trapping C access for RED: The Visible Sticky Shunt, or the Hidden Sticky Trap. Visible stickies are a clear sign of danger to your enemy, and chances are good that instead of taking the time to shoot or blow your stickies away so they can keep running out the left, they will instead glance at them and run the other way. The deterrence of visible bombs shunts the enemy right into the path of stickies you have hidden in a seemingly free spot. Novice to moderately-skilled-and-rushing players often fall for this.
The hidden sticky trap is self-explanatory and pretty much a repeat of the means employed to lock down A cap. Both tactics rely on your bomb placement and creativity as a Demoman (which is why I find it amusing when people complain about Demomen being brainless bomb-spammers, but I digress). Position yourself at the knee-high guard rail (which is where figure 3.b was taken from) as this will give you moderate shielding on your right, as well as window visibility into RED’s spawn corridor, granting advanced warning of when the enemy is coming from there. Also, beware of spies and flanking enemies from the B-C and E-C entryways; just s RED sometimes can’t watch all the entryways, BLU capturing can’t either!
If you’re able to secure this area with the aid of your team, congratulations! RED is successfully locked inside their own base, where they will tighten their hold on D and E. It’s time to loosen their grip, boyos…
That will do it for now. Come back next time where we’ll examine multi-angle approaches to freeing D and E from RED! Feedback for The DemoVixen’s How-To is totally welcome either here or on Niko’s Steam Communities profile page.
- Voop Out


